Creating a dedicated BBQ area turns a backyard into a year-round gathering spot that rivals any indoor kitchen. Whether grilling on weeknights or hosting weekend cookouts, a well-planned outdoor cooking zone delivers functionality and ambiance that elevate every meal. Smart design choices, from grill placement to seating layout, make the difference between a cramped, underused corner and a space everyone gravitates toward. With careful attention to location, features, and creature comforts, homeowners can build a BBQ area that works as hard as it entertains.
Table of Contents
ToggleKey Takeaways
- Positioning your BBQ area 10–20 feet from the house with proper wind direction prevents smoke and heat issues while keeping outdoor cooking convenient and functional.
- Level ground, stable grill footing, and nearby utility access (natural gas, electrical, and water) are non-negotiable foundations for a successful backyard BBQ area design.
- Plan cooking zones using the work triangle principle with 3–4 feet of clearance around the grill, plus 4–6 linear feet of heat-resistant countertop for safe and efficient food preparation.
- Shade structures like pergolas, solid roofs, or retractable awnings extend usable hours and comfort, with DIY pergolas offering budget-friendly protection for year-round entertaining.
- Strategic lighting combining task lighting over cooking zones with low-voltage landscape and string lights creates both safety and ambiance for day-to-night gatherings.
- Thoughtful seating arrangements—dining tables near the grill, conversation areas 8–12 feet away, and bar-height stools along the island—encourage guests to linger and engage with the cooking experience.
Choose the Perfect Location for Your BBQ Area
Site selection determines how often a BBQ area gets used and how well it functions. Start by identifying a spot that’s 10–20 feet from the house, close enough for convenient trips to the indoor kitchen, but far enough to keep smoke and heat away from windows and siding. Check prevailing wind direction: positioning the grill so smoke blows away from seating areas and neighboring properties prevents complaints and discomfort.
Level ground is non-negotiable. Grills need stable footing, and uneven surfaces create trip hazards around high-traffic cooking zones. If the yard slopes, plan for grading or a raised platform using compacted gravel and pavers. Avoid low spots where water collects after rain, standing water undermines hardscape and creates mosquito breeding grounds.
Proximity to utilities matters more than many DIYers realize. Running a natural gas line to a built-in grill requires a licensed plumber and often a permit. Electrical outlets (GFCI-protected, per NEC Article 210.8) power refrigerators, lights, and small appliances. Water access simplifies cleanup and handwashing. If utilities aren’t nearby, factor trenching and conduit runs into the budget, these add $500–$2,000 depending on distance and local labor rates.
Consider sight lines from the house. A BBQ area visible from the kitchen or living room keeps the cook connected to indoor activity. This layout works especially well for outdoor kitchen setups that integrate multiple cooking appliances and prep zones. Avoid placing the grill where headlights from the driveway shine directly into guests’ eyes or where it blocks foot traffic to other backyard features.
Essential Features Every Great BBQ Area Needs
Grill Stations and Cooking Zones
The grill anchors the entire area, so choose one that matches cooking habits and fuel preferences. Built-in gas grills offer convenience and integrate cleanly into masonry islands, but they require permanent gas lines and professional installation. Freestanding charcoal or pellet grills provide flexibility and authentic smoke flavor without the commitment of a fixed structure. For serious cooks, a hybrid setup, gas for weeknight speed, charcoal for weekend low-and-slow, delivers the best of both worlds.
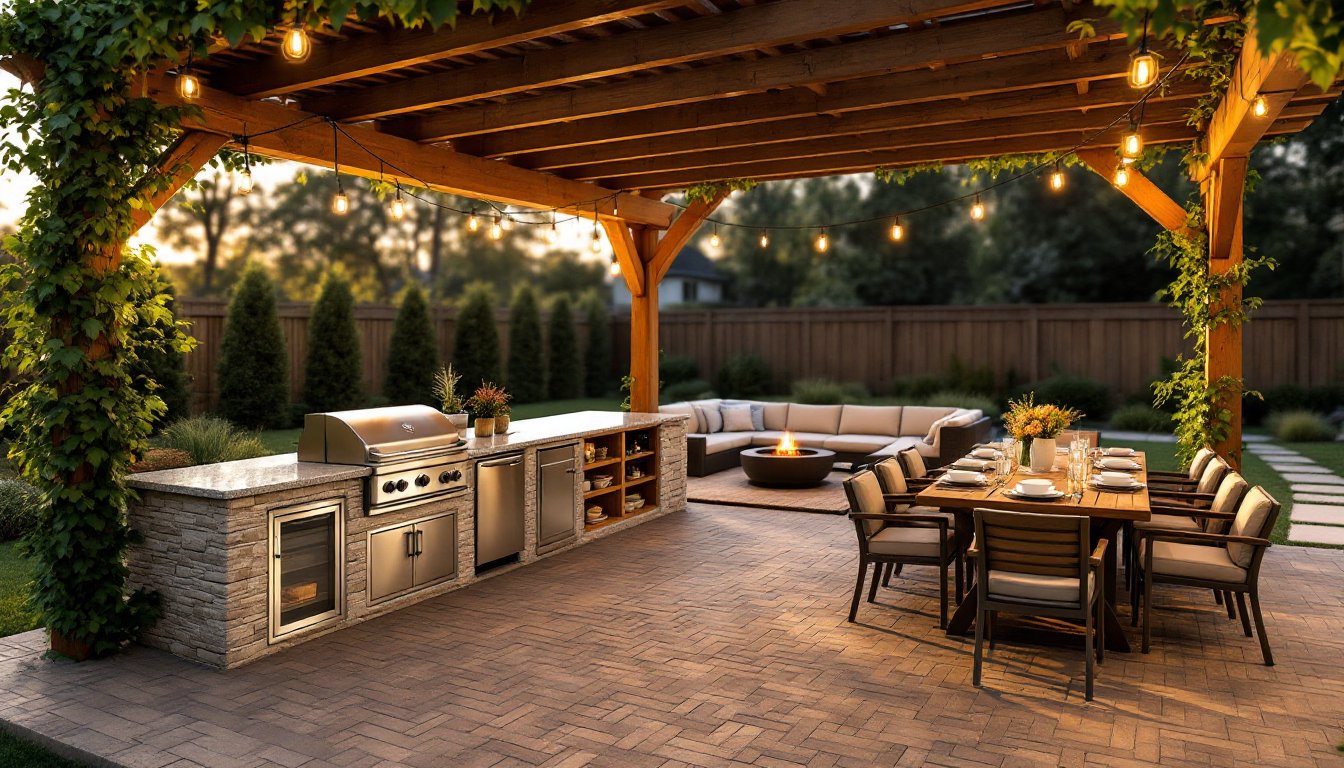
Plan the cooking zone with the work triangle in mind: grill, prep surface, and serving area should form a compact layout that minimizes steps. Allow 3–4 feet of clearance around the grill on all sides for safe maneuvering. If building a grill island, use concrete block or steel-stud framing clad in stone veneer or stucco. These materials withstand heat and weather far better than wood framing. Apply a heat-resistant backer board behind the grill and install a 304-grade stainless steel access door for propane tank storage.
Side burners, warming drawers, and rotisserie attachments expand cooking capacity without requiring a second grill. Many outdoor kitchens featured on Sunset incorporate these features into modular islands that grow with the homeowner’s needs. Just remember: every added appliance increases utility demands and installation complexity.
Counter Space and Storage Solutions
Counter space disappears fast when plating food, mixing marinades, and managing tools. Budget at least 4–6 linear feet of countertop adjacent to the grill, more if hosting large groups. Granite, concrete, and porcelain tile handle heat, moisture, and staining better than laminate or wood. For a budget-friendly option, poured-in-place concrete counters ($50–$80 per square foot installed) offer durability and customization with integral color and texture options.
Storage keeps supplies organized and reduces trips indoors. Install weatherproof base cabinets with marine-grade plywood boxes and stainless steel or powder-coated aluminum doors. Standard indoor cabinetry warps and delaminates outdoors within a season. Include pull-out shelves for easy access to propane tanks, charcoal bags, and grill tools. A dedicated trash pullout with a lid prevents critters from raiding leftovers.
Open shelving provides quick access to frequently used items but exposes contents to weather and dust. Compromise with a mix: closed cabinets for storage, a single open shelf for plates and serving platters during active cooking. Add hooks or a magnetic strip on the grill island side for tongs, spatulas, and basting brushes, keeping tools within arm’s reach without cluttering the counter.
Seating and Dining Arrangements That Encourage Gathering
Seating layout determines whether guests linger or drift away after eating. A dining table near the grill keeps everyone engaged with the cooking process. For intimate gatherings, a 6- to 8-foot rectangular table seats six to eight comfortably. Extending or modular tables adapt to varying group sizes without monopolizing space when not in use.
Material choice impacts durability and maintenance. Teak, eucalyptus, and powder-coated aluminum hold up to sun and rain with minimal upkeep. Avoid untreated softwoods and low-grade plastics that crack or fade within a couple of seasons. If building a custom table, use 5/4-inch deck boards (actual thickness 1 inch) for the top and seal with a penetrating oil finish that resists moisture and UV damage.
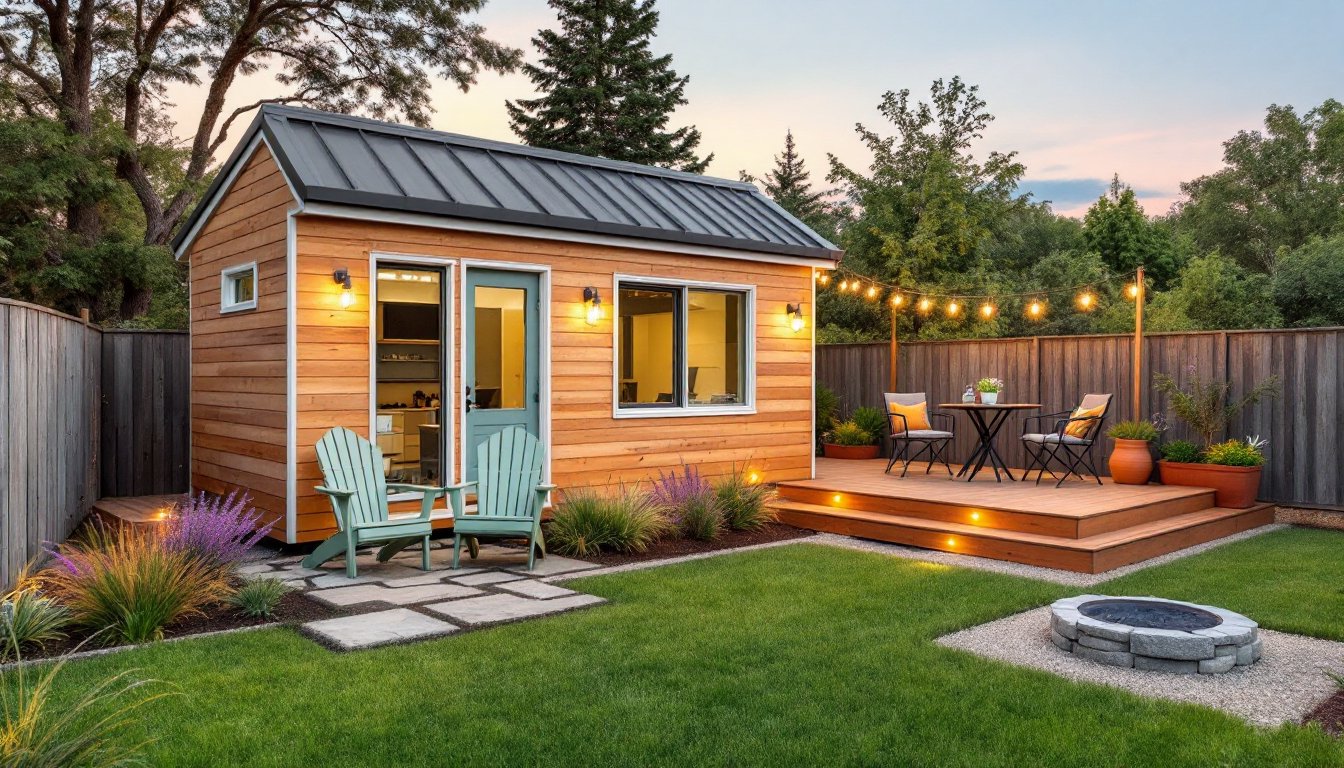
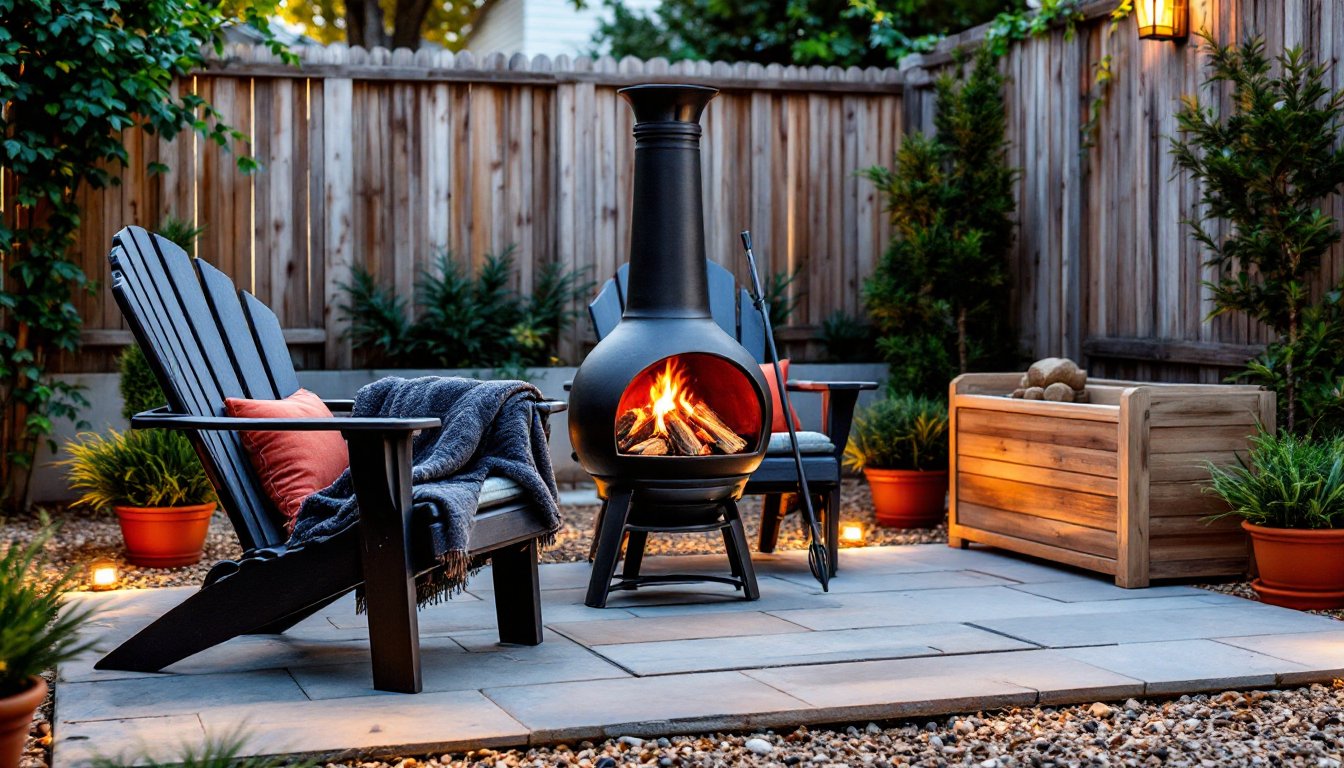
Conversation areas separate dining from lounging. Position a sectional or seating group 8–12 feet from the grill to keep guests comfortable without interference from cooking activity. L-shaped arrangements encourage interaction better than linear rows. Include a propane or natural gas fire pit as a focal point, these extend usable evenings into cooler months and provide ambient warmth without the smoke and maintenance of wood-burning models.
Bar-height seating along the grill island perimeter invites guests to interact with the cook without crowding the work zone. Standard bar height is 42 inches, requiring stools with a 30-inch seat height. Ensure at least 24 inches of counter overhang to provide knee clearance. For casual settings that blend well with backyard landscape designs, built-in benches with cushions offer flexible seating that doesn’t require storage during off-season.
Shade, Shelter, and Weather Protection Options
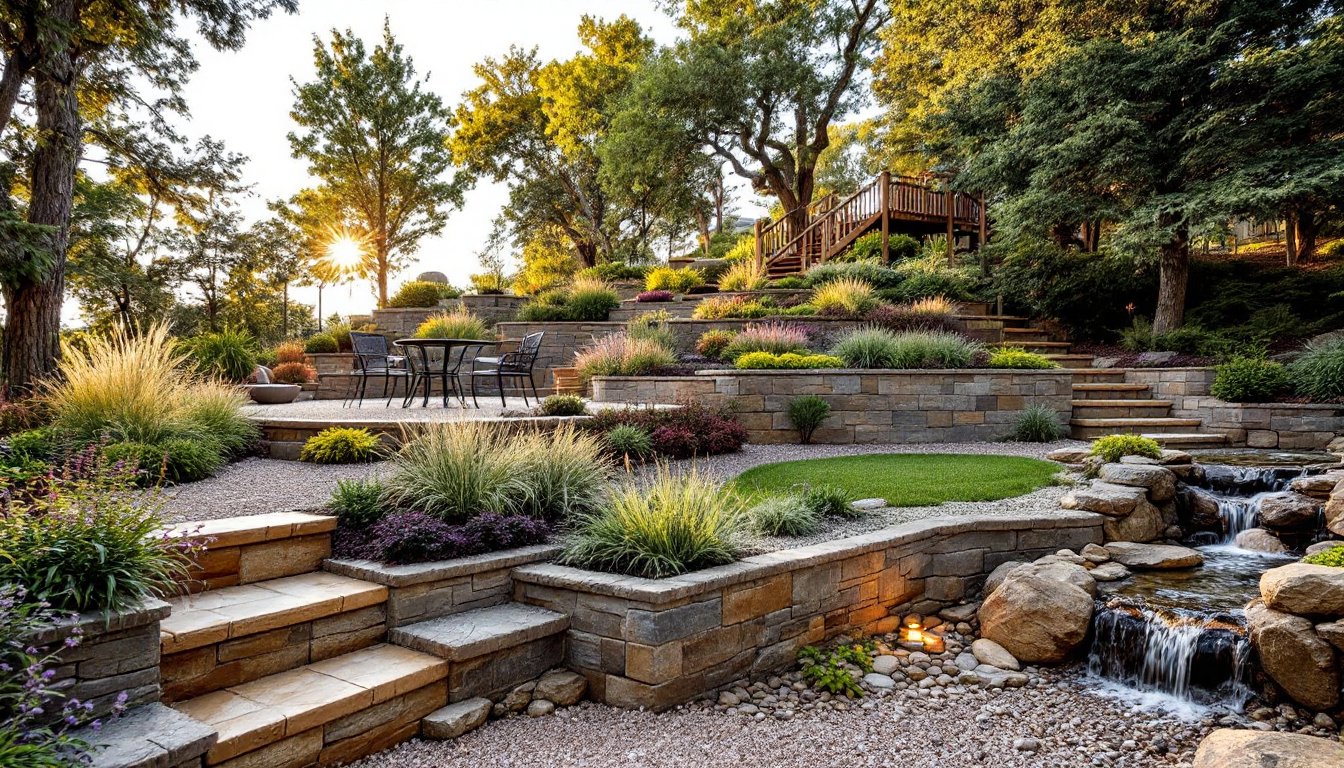
Shade transforms a BBQ area from a midday oven into a usable space through summer afternoons. Pergolas provide partial shade and architectural interest without the cost or permitting headaches of a full roof. Build with pressure-treated 4×4 or 6×6 posts set in concrete footings at least 36 inches deep (or below frost line in cold climates). Space rafters 12–16 inches on center and add a climbing vine like wisteria or grapevine for additional coverage that improves over time.
For complete rain and sun protection, a solid roof structure requires engineering and often a building permit. Gable or shed-style roofs shed water effectively. Use metal roofing or standing seam panels, they’re lighter than asphalt shingles, won’t ignite from grill flare-ups, and last 40+ years. Install a ventilated ridge cap or cupola to prevent heat and smoke buildup. Many patio cover designs balance aesthetics with function by mixing solid sections over the grill with open rafters over dining areas.
Retractable awnings split the difference between open-air and full coverage. Motorized models extend at the touch of a button but cost $1,500–$4,000 installed. Manual versions run $500–$1,200 and work fine for smaller areas. Check wind ratings, cheap awnings shred in gusts over 20 mph. Retract fabric during storms and winter to extend its lifespan.
Portable options like cantilever umbrellas ($200–$800) provide flexibility without permanent construction. Choose a model with a heavy cross-base or in-ground sleeve and a UV-resistant canopy rated for 1,000+ hours. They won’t survive high winds, so plan to store them when weather threatens. For budget-conscious projects that align with backyard makeovers on limited funds, a combination of market umbrellas and a simple DIY pergola delivers comfort without very costly.
Lighting and Ambiance for Day-to-Night Entertaining
Task lighting over the grill and prep areas is non-negotiable for safe cooking after sunset. Mount LED floodlights or directional spotlights on the pergola or overhead structure, aiming light at the cooking surface without glare in the cook’s eyes. Look for fixtures rated 3,000–4,000 lumens per grill station. Dimmable models offer flexibility for ambient lighting once cooking wraps up.
Low-voltage landscape lighting (12V systems) adds safety and atmosphere without the installation complexity or permitting requirements of line-voltage (120V) fixtures. Run wire from a transformer located near an outdoor GFCI outlet. Path lights along walkways prevent trips, while uplights on nearby trees or architectural features create visual interest. Experts at The Spruce recommend spacing path lights 6–8 feet apart for even illumination without over-lighting.
String lights deliver instant ambiance at a fraction of the cost of hardwired fixtures. Suspend commercial-grade Edison bulb strings between posts or overhead beams using screw-in cup hooks and galvanized steel cable for tension support. LED versions consume 90% less energy than incandescent and last 25,000+ hours. Avoid flimsy party lights, they fail within a season outdoors.
Fire features provide both light and warmth. Plus to fire pits, consider tiki torches with citronella fuel around the perimeter to discourage mosquitoes. For a modern touch, tabletop bio-ethanol burners create flame without smoke or ash. If building a permanent fire feature, check local fire codes, many municipalities restrict open flames or require spark arrestors and minimum clearances from structures and property lines.
Integrate lighting controls for convenience. Smart switches and timers automate lighting schedules, while motion sensors illuminate pathways only when needed. Weatherproof dimmers installed in a covered location near the entrance let users adjust brightness without walking back to the house. Projects that include an outdoor bar setup benefit from dedicated accent lighting under counters and inside glass-front cabinets, showcasing glassware while providing functional task light.
Don’t overlook safety when mixing electricity and outdoor entertaining. All outlets and fixtures must be GFCI-protected and rated for wet locations (look for a “WP” or “wet location” marking). Bury UF-rated cable at the depth required by local code, typically 12–18 inches under soil, deeper under driveways. If the electrical scope feels beyond DIY comfort, hire a licensed electrician. The cost, usually $500–$1,500 for a typical BBQ area, is minor compared to the risk of improper wiring.