Every dog deserves a secure outdoor space where they can enjoy fresh air without running off or getting into trouble. Building a homemade outdoor dog kennel offers more than containment, it creates a dedicated zone that protects both the dog and the yard. With the right materials and a bit of weekend labor, homeowners can construct a durable, functional kennel tailored to their pup’s size and needs. This guide walks through practical DIY designs that range from budget-friendly chain link setups to sturdy wooden pallet structures, covering everything from site selection to comfort upgrades.
Table of Contents
ToggleKey Takeaways
- A homemade outdoor dog kennel costs $50–$300 depending on materials (chain link, pallets, or PVC), compared to $200–$1,500+ for pre-fabricated options, plus it allows customization for your yard layout and dog’s specific needs.
- Proper sizing requires at least 100 square feet per dog for daily use (double for extended time), with minimum height of 6 feet; an 8×10-foot kennel suits 50-pound dogs while larger breeds need 10×12 feet or more.
- Location and drainage are critical—position the kennel in morning sun/afternoon shade, away from low-lying areas, and slope the floor 1–2% toward gravel trenches or French drains to prevent mud and standing water.
- Secure footings demand post holes 24 inches deep (18 in warm climates) set in concrete with 24–48 hour cure time; use pressure-treated lumber rated UC4A and choose durable ground cover like pea gravel, decomposed granite, or rubber pavers instead of grass.
- Chain link kits offer durability at the lowest cost ($150–$300), wooden pallets provide rustic aesthetics for $50–$200, and PVC pipe enables quick assembly ($80–$150) but suits dogs under 40 pounds only.
- Essential comfort upgrades include shade structures, raised platforms with stall mats, frost-free waterers, double-action latches, and digging barriers—transforming a basic containment space into a functional outdoor retreat your dog will enjoy.
Why Build a DIY Dog Kennel in Your Backyard?
A backyard dog kennel solves several problems at once. It keeps dogs safely contained when supervision isn’t possible, prevents them from digging up gardens or escaping under fences, and gives them a designated outdoor area that’s easier to maintain than the entire yard.
Purchasing a pre-fabricated kennel can run anywhere from $200 to over $1,500, depending on size and materials, and that doesn’t account for delivery or assembly fees. Building one from scratch cuts costs significantly and allows customization for odd yard layouts, sloped terrain, or dogs with specific behavioral needs.
A homemade kennel also integrates better with existing backyard landscape designs, whether that means matching fence styles, working around patios, or positioning near shade trees. Plus, DIY construction means using stronger fasteners, better drainage, or sturdier posts than what’s typical in mass-produced kits.
Before breaking ground, check local zoning ordinances and HOA rules. Some municipalities classify dog kennels as accessory structures that require setback distances from property lines or neighbor notification.
Essential Planning: Size, Location, and Safety Considerations
Size matters more than most people think. A common guideline: allocate at least 100 square feet per dog for kennels used several hours daily, and double that if the dog will spend extended time inside. For a 50-pound dog, an 8×10-foot kennel is workable: larger breeds need 10×12 feet or more. Height should be at least 6 feet to prevent jumping and allow owners to walk in comfortably during cleaning.
Location affects both drainage and comfort. Avoid low-lying areas where water pools after rain. Slope the kennel floor 1–2% toward a gravel trench or French drain to prevent muddy conditions. Position the kennel where it gets morning sun and afternoon shade, under a large tree works, but watch for root interference when digging post holes.
Keep the kennel at least 10 feet from septic drain fields and away from AC condensers or noisy equipment that could stress the dog. If the yard has a slope, terracing or building a raised platform may be necessary.
Safety starts with secure footings. Dig post holes at least 24 inches deep in frost-prone regions: 18 inches suffices in warmer climates. Use pressure-treated lumber rated for ground contact (look for a green or brown tint and a tag marked UC4A or .60 retention). Set posts in fast-setting concrete and let them cure 24–48 hours before attaching rails or panels.
Ground cover is critical. Grass won’t survive heavy paw traffic. Better options include ¾-inch pea gravel over landscape fabric, decomposed granite, or interlocking rubber pavers. Avoid treated wood chips, as some dogs chew them. Concrete is durable but hard on joints and gets scorching hot in summer, if pouring a slab, plan for shade and consider adding a textured finish for traction.
PPE for this stage: Work gloves, safety glasses (especially when mixing concrete or cutting lumber), and steel-toed boots if handling heavy posts.
Budget-Friendly Chain Link Kennel Design
Chain link remains the most economical option for larger kennels, offering durability and visibility. A 10×10-foot chain link kennel typically costs $150–$300 in materials, depending on fence height and gate quality.
Materials list:
- Chain link fabric (4- or 6-foot height, galvanized or vinyl-coated)
- Line posts (1⅝-inch or 2-inch diameter, galvanized steel)
- Corner and gate posts (2⅜-inch diameter, heavier gauge)
- Top rail (1⅜-inch galvanized pipe)
- Tension wire (bottom)
- Gate kit (pre-hung gates save time)
- Post caps, rail ends, tension bands, and tie wires
Assembly steps:
- Mark corners and gate location with stakes and mason’s line. Verify square by measuring diagonals, they should match within ½ inch.
- Dig post holes 8 inches in diameter, 24 inches deep. Space line posts no more than 10 feet apart.
- Set corner and gate posts in concrete. Brace them plumb with 2×4s and let cure for 48 hours.
- Install line posts. These can be driven into compacted soil if ground is soft, or set in concrete for extra rigidity.
- Attach top rail using rail end fittings and loop caps. The rail prevents the fence from sagging.
- Unroll chain link fabric starting at a corner post. Secure with tension bands every 12–15 inches, then stretch fabric taut using a come-along or fence stretcher before fastening to the opposite corner.
- Run tension wire along the bottom, 2 inches above ground, and tie the fabric to it every 24 inches. This prevents dogs from nosing under.
- Hang the gate, adjusting hinges so it swings freely and latches securely.
Tool alternatives: A post-hole digger works fine for a few holes, but renting a gas-powered auger ($40–$60/day) speeds up the job significantly. A pipe cutter makes cleaner cuts on rails than a hacksaw, though either works.
Tip: Vinyl-coated chain link costs 20–30% more but resists rust better and looks less industrial. Black or green coatings blend into landscaping better than bare galvanized.
Wooden Pallet Dog Kennel with Covered Roof
Reclaimed pallets offer a free or low-cost material source for a rustic kennel with solid walls. This design works well for smaller dogs or as a covered run attached to an existing fence. Budget: $100–$200 if buying new lumber for posts and roofing: potentially under $50 if pallets are free.
Materials:
- 8–12 wooden pallets (heat-treated only, avoid chemically treated pallets marked “MB”)
- 4×4 pressure-treated posts for corners
- 2×4 framing lumber for top plates and roof supports
- Corrugated metal roofing panels or polycarbonate sheets
- Roofing screws with rubber washers
- 3-inch exterior wood screws and galvanized nails
- Gate hinges and latch
Construction steps:
- Select and prep pallets. Inspect for broken boards, protruding nails, and splintering. Sand rough edges. Look for stamped “HT” (heat-treated) marking, avoid “MB” (methyl bromide).
- Set four corner posts in concrete, spaced to match pallet dimensions (most pallets are 40×48 inches). Posts should extend 6 feet above grade.
- Attach pallets vertically to posts using 3-inch screws driven through pallet stringers into the 4×4s. Overlap pallet edges slightly or fill gaps with additional boards.
- Frame the roof by fastening 2×4s horizontally across the tops of the posts. Add cross-bracing every 4 feet if the span exceeds 8 feet.
- Install roofing panels with a 1-inch overhang on all sides for rain runoff. Slope the roof at least 3:12 (3 inches of rise per 12 inches of run). Overlap panels by one corrugation and use screws with neoprene washers to prevent leaks.
- Build a gate from a spare pallet or frame one with 2×4s and fence pickets. Hang it on strap hinges rated for outdoor use.
Many woodworking enthusiasts share free dog kennel plans that adapt pallet construction methods for indoor and outdoor use.
Safety note: Wear a dust mask when sanding or cutting pallets, as splinters and embedded dirt can irritate lungs. Gloves prevent punctures from nails.
Upgrade idea: Staple hardware cloth (½-inch mesh) to the inside of pallet walls to prevent paws from getting stuck between slats.
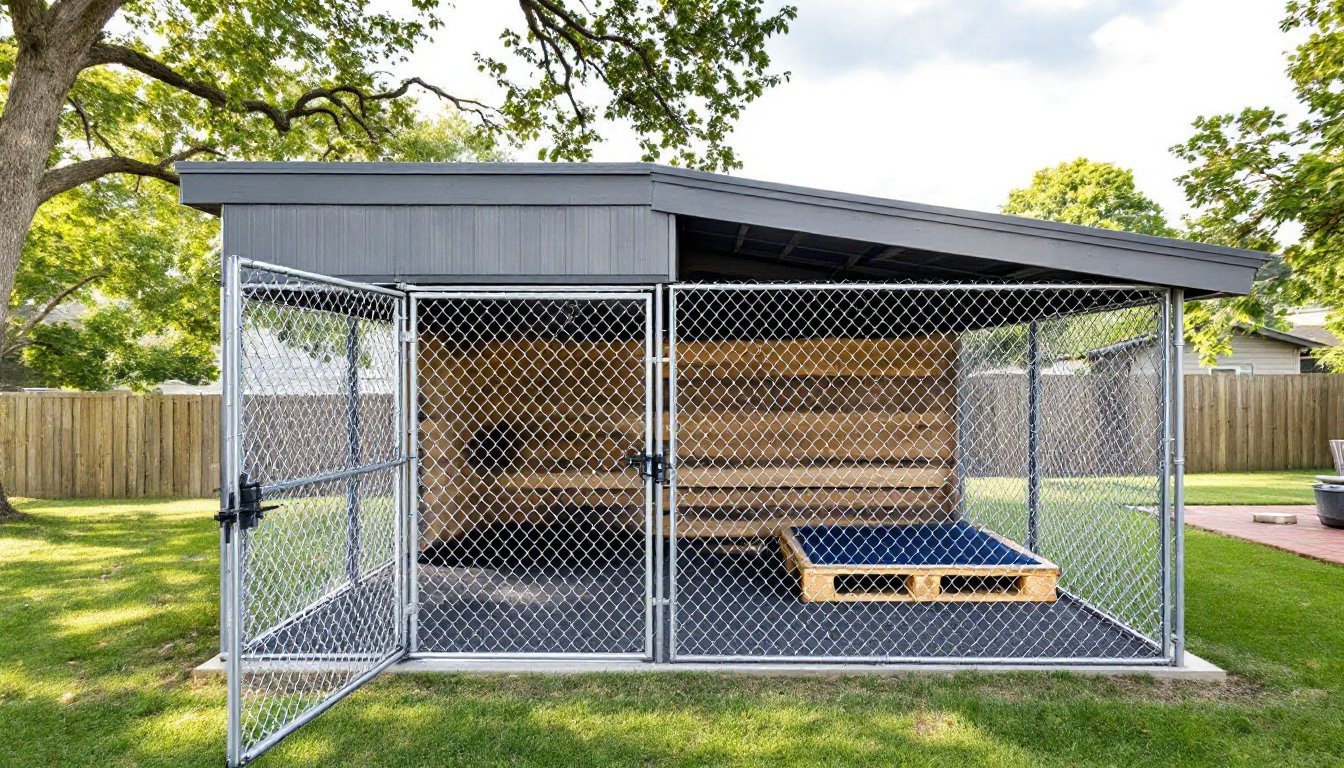
PVC Pipe and Fence Panel Kennel for Easy Assembly
PVC pipe offers a lightweight, no-tools-required framework that’s ideal for renters or temporary setups. Paired with wire fence panels or welded wire, it creates a portable kennel that assembles in under two hours. Cost: $80–$150 for an 8×8-foot enclosure.
Materials:
- 1½-inch Schedule 40 PVC pipe (ten 10-foot lengths)
- PVC elbows, tees, and cross fittings
- 4×8-foot welded wire panels (2×4-inch mesh, 14-gauge)
- Zip ties or wire clips
- PVC cement (optional, for permanent assembly)
- Ground stakes or rebar to anchor corners
Assembly process:
- Cut PVC pipe to size. For an 8×8-foot kennel, cut eight 4-foot vertical posts, eight 8-foot horizontal rails (four for top, four for bottom), and four 8-foot cross-braces for the roof.
- Dry-fit the frame using tee and elbow fittings. Don’t cement joints yet, this allows disassembly and adjustments.
- Attach welded wire panels to the frame with heavy-duty zip ties every 6 inches. Pull ties snug but not tight enough to crack the PVC.
- Anchor the corners by driving 2-foot rebar stakes through the bottom corner fittings and 12 inches into the ground.
- Add a roof frame using cross-bracing and drape a tarp or shade cloth over it. Secure with bungee cords.
For those new to PVC projects, sites like Fix This Build That offer beginner-friendly tutorials on cutting, fitting, and reinforcing PVC structures.
Limitations: PVC isn’t strong enough for large, aggressive chewers or dogs that jump hard against fences. It works best for dogs under 40 pounds or as a temporary solution. In freezing climates, PVC can become brittle, bring the kennel indoors during winter or use Schedule 80 (thicker-walled) pipe.
Tool tip: A PVC pipe cutter ($10–$15) makes cleaner cuts than a hacksaw and prevents the pipe from cracking. A miter saw with a fine-tooth blade also works.
Upgrades and Comfort Features for Your Dog Kennel
A basic kennel keeps dogs contained, but a few thoughtful upgrades turn it into a comfortable outdoor retreat.
Shade structures: A roof is non-negotiable in hot climates. If a full roof isn’t feasible, install a shade sail (tensioned fabric canopy) over half the kennel. Mount it at a 30–45 degree angle for rain runoff. Cost: $30–$80 for a 10×10-foot sail.
Raised dog house or platform: Keeping the dog off the ground improves comfort and reduces exposure to mud and pests. Build a simple platform from 2×4 framing and ¾-inch treated plywood, elevated 6–8 inches on cinder blocks. Add outdoor carpet or rubber stall mats on top. For cold climates, insulate the dog house with rigid foam board and weatherstrip the door opening.
Automatic waterers: A gravity-fed waterer or frost-free livestock waterer ensures fresh water without daily refills. Install a dedicated water line if the kennel is permanent, or use a hose quick-connect for seasonal setups. In freezing weather, swap to a heated bowl (thermostatically controlled models prevent overheating).
Digging barriers: If the dog is a digger, bury hardware cloth (½-inch galvanized mesh) 12 inches deep along the fence line, bent outward in an L-shape. Alternatively, pour a shallow concrete curb (4 inches wide, 6 inches deep) around the perimeter.
Secure latching: Standard gate latches aren’t dog-proof. Upgrade to a double-action latch (requires lifting and pulling) or add a carabiner clip for extra security. For clever escape artists, a keyed padlock is foolproof.
Ground reinforcement: High-traffic areas near the gate or water bowl turn to mud quickly. Lay down interlocking rubber pavers or pour a small concrete pad (4×4 feet) in those zones. Rubber is gentler on joints than concrete and provides better traction.
Homeowners integrating kennels into larger backyard makeovers often add decorative elements like planter boxes along the fence line or train climbing vines (non-toxic varieties like honeysuckle) on chain link for a softer look.
For more advanced builds involving overhead structures, The Handyman’s Daughter offers step-by-step guides on framing and roofing techniques that translate well to kennel projects.
Conclusion
Building a backyard dog kennel doesn’t require a contractor’s license or a truckload of expensive materials. Whether opting for chain link durability, pallet resourcefulness, or PVC simplicity, the key is matching the design to the dog’s size, behavior, and the yard’s conditions. Proper planning, especially around drainage, secure footings, and weatherproofing, prevents most common failures. With a weekend’s work and attention to the details that matter (shade, water access, and solid latching), homeowners can create a safe, functional space their dogs will actually enjoy.